
Here are the steps to guide you through configuring and setting up a Windows server on Kamatera. First, you’ll need to create your Kamatera account. Then, using the Kamatera management console, you’ll sign up for an account, log in using your new credentials, and create a server that is preconfigured with the Windows operating system.
1. Create an account on Kamatera
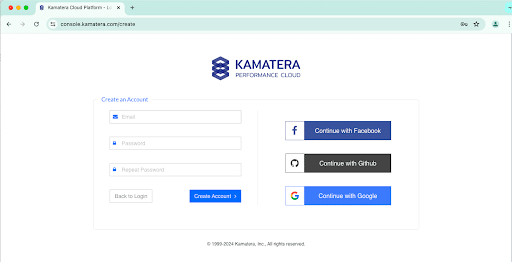
Go to console.kamatera.com and sign up for an account by providing the following information:
- Verify Your Email: Click the verification link sent to your email by Kamatera.
- Password: Enter your password.
- Repeat Password: Re-enter your password and click Create Account.
2. Access the Kamatera management console
Log In: Enter your credentials to access the Kamatera management console.

Click login.

Use case: For this configuration, we used the Asia server domain for our Windows Server.
| Field | Description |
| Type | Type B-General Purpose– Server CPU are assigned to a dedicated physical CPU thread with reserved resources guaranteed.
Type D–Dedicated – –Server CPU are assigned to a dedicated physical CPU Core (2 threads) with reserved resources guaranteed. Type T – Burst – Server CPU are assigned to a dedicated physical CPU thread with reserved resources guaranteed. Exceeding an average usage of 10% will be extra charged for CPUs usage consumption. Type A-Availability- Server CPUs are assigned to a non-dedicated physical CPU thread with no resources guaranteed. Note: More information on CPU types is available on the My Cloud- Pricing page. |
| CPU | Choose the number of vCPUs that will be installed on the server. Type B/T can be configured with upto 104 vCPUs per server. Based on Intel’s latest Xeon Processors, 2.7 GHz+. |
| RAM | Choose the amount of RAM that will be installed on the server. Type B/T/D can be configured with upto 512GB RAM per server. |
| NVMe SSD DISK | Choose NVMe SSD Storage Size. You can add upto 15 NVMe SSD Disk. NVMe SSD Storage includes unlimited IOPS and unlimited storage bandwidth, free of charge. |
| Daily Backup | Toggle the switch to enable extended daily backups of your server’s storage to external backup storage. |
| Management Services | Toggle the switch to enable Management Services to the server’s operating system by Kamatera Technical Support Team. |
- Choose Networking
You can select the network they wish to use, whether it’s a public Internet network or a private local network.
Simple Mode
Advanced Mode
· WAN
· LAN
· New LAN
Select auto from the options available in the drop-down menu.
· Auto
· Network
Select auto from the options available in the drop-down menu.
· Auto
· IP
- Advanced Configuration
Hide – If you want to hide the advanced configuration.
Show – If you want to see the advanced configuration.
Note: For Windows system use Power Shell.
- Finalize Settings
Finalize settings by setting the password, re-validating it, selecting the number of servers, specifying the server name, and enabling the Power On Servers option.
Password allowed characters: a-z, A-Z,0-9 !@#$^&*()~ and must meet the following requirements:
· At least 14 characters
· At most 32 characters
· At least one lowercase character
· At least one upper case character
· At least one number
· Includes allowed characters only
Note: Once you enter your details in Finalize Settings, you can select either the Monthly Billing Cycle or Hourly Billing, depending on your requirements.
- Billing Cycle and Pricing
You can choose between the Monthly Billing Cycle and Hourly Billing Cycle.
Note: The Server Summary displays the location, operating system (including server specifications), add-on services, servers, and pricing.
Click Create Server.
The server will be created and will appear on the Server Management screen.
Once the server is created, click Open.

- A new tab opens where you can log in to your new server. After you log in, the Server manager dashboard will display. Here, you can configure the local server by selecting
- Add roles and features: Install roles, role services, and features based on the computing needs of your organization.
- Add servers: Search for other computers using the Active Directory Domain Services.
- Create a server group: You can create a server group from the server pool.
- Connect this server to cloud services: Integrate this server with cloud services.
Congratulations! You have successfully opened an account and configured a Windows server on the Kamatera platform.